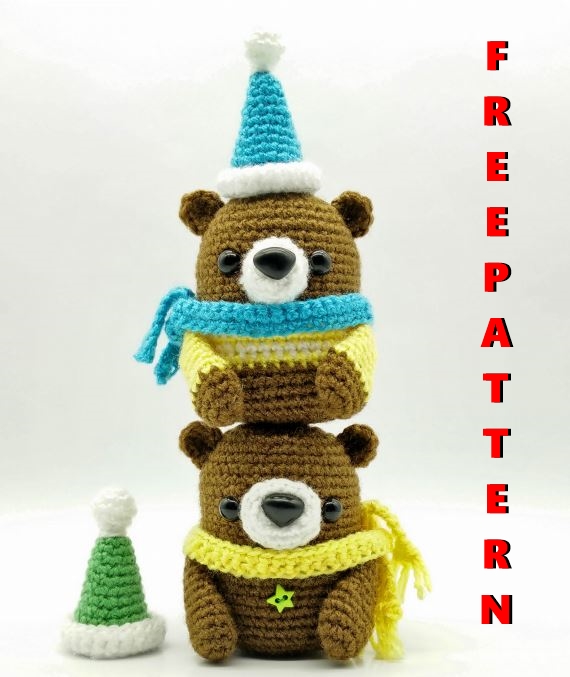
Lazzy Bears Free Amigurumi Pattern
Hello dear visitors, I am here again with new amigurumi molds for you. I am sharing amigurumi patterns for you here for free. You can make your children happy by making these patterns. Amigurumi toys are very popular lately and are the most beautiful toys that don’t harm your kids. Your kids will love them. Let’s move on to our pattern and give them this gift.
Desinger : https://talesoftwistedfibers.wordpress.com/
This is an original pattern by Tales of Twisted Fibers
Materials
• Sock weight yarn in in brown, white, yellow,
green [for plain bear] | brown, white, yellow,
blue [for striped bear]
• 2.5mm crochet hook
• A pair of 9mm safety eyes for each bear
• 15mm nose for each bear
• 10mm green star shaped button
• Fiber fill
• Green sewing thread
• Yarn needle
• Sewing needle
• Pearl headed pins
Terminology [US]
ch [chain]
st [stitch]
magic ring
sc [single crochet]
hdc [half double crochet]
dc [double crochet]
inc [increase]
dec [decrease]
FLO [front loop only]
sl st [slip stitch]
DIFFICULTY: Easy
FINISHED SIZE: 3.5 inches [9 cm] till the tip of
their ears / approximately 5.5 inches [14 cm] with
their hat on when made with the indicated yarn.
MUZZLE
With white yarn, ch 5.
Rnd 1: Starting from the second ch from the hook, sc in
the next 3 st, inc in the last ch. Working on the opposite
side of the foundation ch, sc in the next 3 ch. [8]
Rnd 2: (inc, sc) X 4. [12]
Rnd 3: sc around. [12]
Fasten off, leaving a long tail to sew. Insert nose in the
center of the muzzle and secure it in place with the
washer. Keep it aside.
HEAD & BODY
Plain Bear
Start with brown yarn.
Rnd 1: 10 sc in a magic ring. [10]
Rnd 2: inc X 10. [2]
Rnd 3: (sc, inc) X 10. [30]
Rnd 4: (sc 2, inc) X 10. [40]
Rnd 5-25: sc around. [40]
Rnd 26: (sc 2, dec) X 10. [30]
Rnd 27: (sc, dec) X 10. [20]
Lightly stuff the muzzle, pin it between Rnd 9 & 15 with
pearl headed pins and sew it in place.
Insert safety eyes on both sides of the muzzles between
Rnd 10 & 11.
Stuff the body with fiber fill.
Rnd 28: dec X 10. [10]
Rnd 29: dec X 5. [5]
Fasten off, leaving a tail for sewing. Using your
yarn needle, weave the yarn tail through the front
loop of each remaining stitch and pull it tight,
closing off the gap. Weave in the yarn end. Sew
the star shaped button on the chest.
Striped Bear
Start with brown yarn.
Rnd 1-15: Follow instructions for Plain Bear Rnd
1-15.
Rnd 16: With yellow yarn, sc around. [40]
Rnd 17: With white yarn, sc around. [40]
Rnd 18: With yellow yarn, sc around. [40]
Rnd 19: With white yarn, sc around. [40] Fasten off
this color.
Rnd 20: With yellow yarn, sc around. [40] Fasten
off this color.
Rnd 21-29: With brown yarn, follow instructions
for Plain Bear Rnd 21-29, including instructions for
fastening off and closing the gap.
EAR (make 2 in brown)
In a magic ring, sc, 2 hdc, 2 dc, 2 hdc, sc. Pull the
yarn tail to close the magic ring and form a semi
circle. Fasten off, leaving a tail to sew.
Pin the ears on the head, with the top of the ear
sitting between Rnd 4 & 5, and sew in place.
ARM (make 2)
Start with brown yarn.
Rnd 1: 6 sc in a magic ring. [6]
Rnd 2: inc X 6. [12]
Rnd 3-4: sc around. [12]
If making Plain Bear, continue working in brown till
the end. For Striped Bear, work with yellow yarn
from the next round onwards.
Rnd 5-6: sc around. [12]
Rnd 7: (sc, dec) X 4. [8]
Rnd 8-12: sc around. [8]
Fasten off, leaving a long tail to sew. The arms do
not need stuffing.
Flatten the top of the arm and sew it closed. Pin the
arm diagonally on the body, with the top of the arm
pinned on Rnd 16, and sew it in place.
Next, we will secure the arms to the body to prevent
it from moving.
Thread a yarn needle with brown / yellow yarn.
Insert needle from the bottom of the body, bring it
out from the area where the arm rest against the
body, which would be around Rnd 19. Make a tack
on the inside of the arm (between Rnd 10 & 11),
push the needle back into the body, and bring it
out from the bottom the body. Knot the yarn ends
together a few times to secure. Clip off excess yarn
and push remaining yarn back into the body.
SCARF
ch 67 with yellow / blue yarn.
Row 1: Starting from the second ch from the hook,
sc 66, ch 1, turn. [66]
Row 2: sc across. [66]
Fasten off, weave in the yarn ends. Tie the scarf
around the neck.
HAT
Start with green / blue yarn.
Rnd 1: 6 sc in a magic ring. [6]
Rnd 2: (sc, inc) X 3. [9]
Rnd 3: sc around. [9]
Rnd 4: (sc 2, inc) X 3. [12]
Rnd 5: sc around. [12]
Rnd 6: (sc 3, inc) X 3. [15]
Rnd 7: sc around. [15]
Rnd 8: (sc 4, inc) X 3. [18]
Rnd 9: sc around. [18]
Rnd 10: (sc 5, inc) X 3. [21]
Fasten off this color and join white yarn.
Rnd 11: sc around. [21]
Rnd 12: (sc 6, inc) X 3. [24]
Rnd 13: sl st in the front loop of the next st, ch 3.
Working in FLO, dc around; sl st in the first st to
join. [24]
Fasten off and weave in the yarn tail. Fold the
white border outwards.
Pom Pom
Rnd 1: With white yarn, 5 sc in a magic ring. [5]
Rnd 2: inc X 5. [10]
Rnd 3: sc around. [10]
Stuff very lightly.
Rnd 4: dec X 5. [5]
Fasten off and sew it on top of the hat. Secure the
hat on the head with a few tacks.