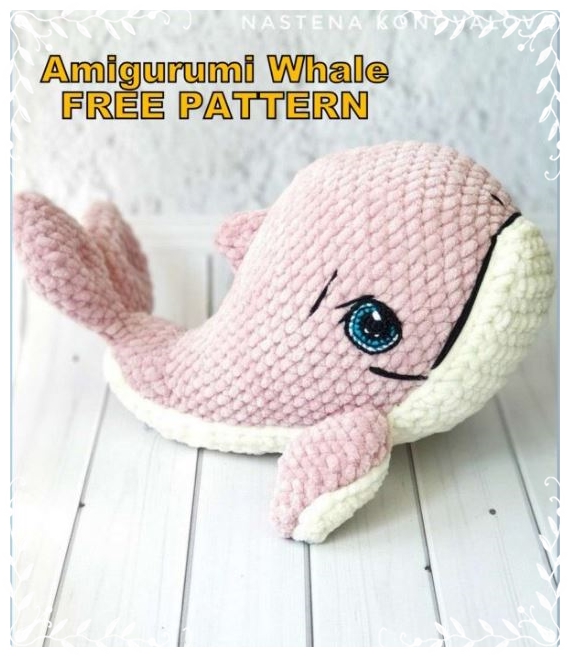
Amigurumi Whale Free Pattern
Hello dear visitors, I am here again with new amigurumi molds for you. I am sharing amigurumi patterns for you here for free. You can make your children happy by making these patterns. Amigurumi toys are very popular lately and are the most beautiful toys that don’t harm your kids. Your kids will love them. Let’s move on to our pattern and give them this gift.
Main materials for toy:
– Plush yarn – “Himalayas” “Dolphin baby” or “YarnArt” “Dolce” (120 m / 100
gr.) Select the colors of the yarn to create this toy for your taste (I
blue whale yarn is used to knit “YarnArt” “Dolce” number 758, and
lilac – “Himalayas“ “Dolphin baby” number 80349;
– thread “Vita” “Coco” or similar – to sew the pieces and knit the eyes
(white, blue and black colors);
– hooks (use 4 mm for toys and 1.25 mm for eyes);
– hollofiber or sintepuh (or any filler you usually use)
) Use of;
– needle, marker, scissors.
Abbreviations
Mr = Magic ring
sc = single crochet
inc = Increase
dec = decrease
sl-st = slip-stitch
dc =double crochet
INFORMATION ON HOW TO CARRY A MARKER FOR IT TO GO
EXACTLY:
This toy is knitted in a spiral, based on this marker (any thread)
constantly shifting to the side. To prevent this from happening, we make loops
displacement, after about 3-5 rows, it depends on what density and
which hook number do you knit, from yarn, etc. The marker must pass
do not move anywhere in a straight line, so any part is always
will be the way you conceived it, and as provided in the description.
Well =) We start our knitting =)
In the toy, we follow the marker: it must go strictly in the center of the abdomen from
nose to tail! (see photo)
We start knitting with the body, knit with the main color:
1) Magic ring into 6sc
2) 6 inc (12)
3) (1 sc, inc) * 6 (18)
4) 1 sc, inc, (2 sc, inc) * 5, 1 sc (24)
5) (3 sc, inc) * 6 (30)
6) 2 sc, inc, (4 sc, inc) * 5, 2 sc (36)
7) (5 sc, inc) * 6 (42)
8) 3 sc, inc, (6 sc, inc) * 5, 3 sc (48)
9) (7 sc, inc) * 6 (54)
10) – 18) 54 sc (9 rows)
19) 15 sc, dec, 3 sc, dec, 3 sc, 2 dec,
3sc, dec, 3 sc, dec, 15 sc (48)
20) 48 sc
21) 14 sc, dec, 2 sc, dec, 2 sc, 2 dec, 2 sc, dec,
2 sc, dec, 14 sc (42)
22) 42 sc
23) 13 sc, dec, 1 sc, dec, 1 sc, 2 dec, 1 sc, dec,
1 sc, dec, 13 sc (36)
24) 36 sc
25) 12 sc, 6 dec, 12 sc (30)
26) 30 sc, fill the toy, and then
we fill in the course of knitting
27) 7 sc, dec, 1 sc, dec, 1 sc, 2 dec, 1 sc,
1 dec, 1 sc, dec, 7 sc (24)
28) 24 sc
29) 5 sc, dec, 2 sc, dec, 2 sc, dec, 2 sc,
dec, 5 sc (20)
30) 20 sc
31) – 33) 5 HDC, 10 SL-ST, 5 HDC (20)
(3 rows)
34) 1 sc, dec, 2 sc, dec, 6 sc, dec, 2 sc,
dec, 1 sc (16)
35) 16 sc
36) dec, 1 sc, dec, 6 sc, dec, 1 sc, dec (12)
37) 12 sc
Next, we knit the tail.
To do this, pull out the hook, but
do not cut the thread. From the end of knitting
count down 6 sc and
pull out the hook loop.
Thus, the hole formed
divided into 2 equal parts, 6 sc each
circle
We knit the first part of the tail (the second
we knit in the same way):
1) 6 sc
2) (1sc, inc) * 3 (9)
3) (2 sc, inc) * 3 (12)
4) (3 sc, inc) * 3 (15)
5) (4 sc, inc) * 3 (18)
6) (5 sc, inc) * 3 (21)
7) 21 sc
8) (5 sc, dec) * 3 (18)
9) (4 sc, dec) * 3 (15)
10) (3 sc, dec) * 3 (12)
11) (2 sc, dec) * 3 (9)
12) (1 sc, dec) * 3 (6)
Cut the thread, fix the hole
pull it together, incyach a thread into a toy.
The tail does not need to be filled.
Side fins:
step back from the start of knitting 16 rows
down and 3 loops to the left and inc
side of the marker (see photo), set
pins, then back from the pins
3 more loops to the sides and also
put the pins, then step back 2
rows up and 2 rows down, and put on
center from the first 2 pins 1 more
pin (should make diamonds)
(see photo).
Now we knit fins.
We start to knit a kitten from the nose:
1) 9 sc
2) (2 sc, inc) * 3 (12)
3) (3 sc, inc) * 3 (15)
4) 6 sc, 3 inc, 6 sc (18) (increase
located closer to the tail)
5) 18 sc
6) dec, 14 sc, dec (16)
7) dec, 12 sc, dec (14)
8) dec, 10 sc, dec (12)
9) dec, 8 sc, dec (10)
10) dec, 6 sc, dec (8)
11) dec, 4 sc, dec (6)
Cut the thread, fix the hole
pull it together, incyach a thread into a toy.
Do not fill the fins!
Fin along the back:
Find the center of the back. For this from
start knitting retreat inc
row, put a pin, further from it
we retreat 4 rows down, put a pin, and
also put on the sides so that
it turned out a rhombus.
I got 11 sc in a circle.
2 row I also knitted 11 sc, and then
inc made decavings to the end, while
the hole is not very small,
then incostice cut the thread, fastened and
pulled a hole, the remains of the thread
snapped into a toy.
Breast:
Knit with a thread of additional color
turning rows, do not forget at the beginning
each row do CH lift:
8 CH
1) 7 sc
2) inc, 5 sc, inc (9 sc)
3) 9 sc
4) inc, 7 sc, inc (11 sc)
5) – 12) 11 sc (8 rows)
13) dec, 7 sc, dec (9)
14) -18) 9 sc (5 rows)
19) dec, 5 sc, dec (7)
20) -24) 7 sc (5 rows)
25) dec, 3 sc, dec (5)
26) – 29) 5 sc (4 rows)
30) dec, 1 sc, dec (3)
31) -35) 3 (5 rows), cut the thread, fix it.
Tie out the fins on the breast.
To do this, retreat 18 rows down from the top of the breast, insert the hook and knit:
1) 3 sc
2) inc, 2 sc (4)
3) 3 sc, inc (5)
4) -5) 5 sc (2 rows)
6) dec, 3 sc (4)
7) 2 sc, dec (3)
8) dec, 1 sc (2)
9) dec, cut the thread, fix
On the other hand, we knit in the same way
symmetrically, just flip
the breast so that the fin knits exactly
just like the first one.
Now we bind our breast
the entire perimeter of SC.
Eyes:
(detailed video on how to tie
eyes you can look at me
on a channel in Utec, or in
videos in a group in VK)
1) We begin to knit black knitwear:
Magic ring into 6sc
2) 6 inc (12)
3) (1 sc, inc) * 6 (18), change the thread to
I guess
4) (2 sc, inc) * 4, 1 sc, change the thread
to white
5) move the thread up, behind the eye,
stepping back from the naked 2 loops,
pull the white thread through it,
inc continue to knit in a circle
insert the hook immediately into
the next chain and knit:
(3 sc, inc) * 4, 2 sc, sl-st, thread
pull, fasten, trim,
leaving an end for incubation.
Eye Design:
Left eye knit 15 sl-st black
thread “Vita” “Coco”, starting
above the black edge; when
make another sl-st, a little thread
Pull out so the eye does not tighten.
Next, thread the black thread into the needle and
we carefully incase over gold
colors with regular stripes stitches (see
a photo).
On the inc eye, make a black thread sl-st, starting from the white edge, counting
along the white edge from the bottom of 6 stitches, and knit to black 15 sl-st, also
we sew stitches with black thread over a gold color.
Leave the threads in black and white to embroider, the rest of the strings
can be tied under the eye to a knot and trimmed.
Toy assembly:
İncicle our breast
pins (see photo),
we write.
İncish eyes.
We embroider a smile (I embroidered a thread
black “Vita” “Coco” in 4
addition).
We embroider cilia, eyebrows, (I embroidered
black thread “Vita” “Coco” in 2
addition)